How to service a Mixergy cylinder and the benefits of Care Plan
Homeowners – Mixergy Care Plan
The Mixergy Care Plan gives you hassle-free warranty cover. You don’t need to log an annual physical inspection of your cylinder with us for your warranty to remain valid. We use remote diagnostics to monitor your cylinder. To sign-up, simply choose your care plan options in the Mixergy app.
If you’re not on the Mixergy Care Plan, your G3 certified Installer will need to submit to us an annual inspection for your warranty to remain valid.
We recommend Installers follow our simple checklist for the essential components of an annual service below.
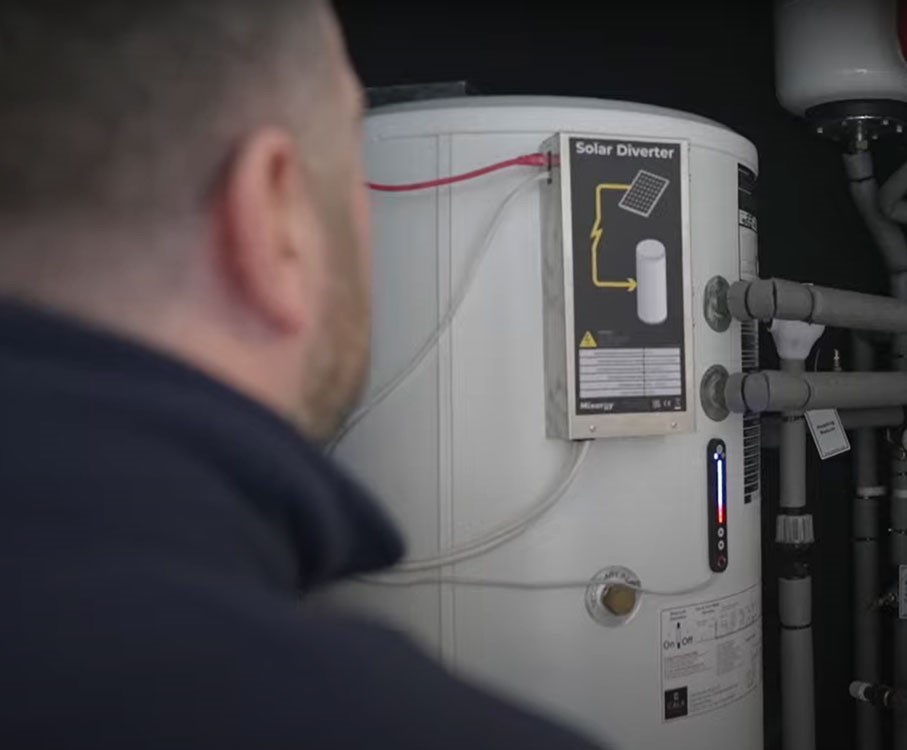
Visual check
- Look for any obvious defects or damage in the cylinder shape, connections, pipework, Mixergy controller box, and any Mixergy additional components (for example, the PV Switch box).
- Check all of the wiring on the cylinder – including the Mixergy controller. Ensure any loosely hanging cables are tidied with suitable clips and not left hanging against anything warm or hot.
Safety valve operation
- Manually operate the temperature/pressure relief valve for a few seconds.
- Check that water is discharged and that it flows freely through the tundish and discharge pipework.
- Check that the valve reseats correctly when released.
- Repeat the above procedure for the expansion relief valve.
Expansion vessel charge pressure
- Turn off the isolating valve before the Pressure Reducing Valve or the mains stop cock to the system.
- Open the lowest hot tap in the system to relieve the system pressure.
- Unscrew the black plastic cap on the expansion vessel to reveal the Schrader valve; with the aid of a pressure gauge, ensure the pressure reads 3.0 bar.
- If there is insufficient pressure within the vessel, top up the vessel using an appropriate pump and recharge to 3.0 bar.
Strainer
With the mains supply turned off and the lowest hot tap open:
- Using a spanner, unscrew the pressure-reducing cartridge and remove the moulded housing. The strainer will be removed with the cartridge.
- Wash any particulate matter from the strainer under clean running water.
- Replace the strainer and screw the pressure-reducing valve cartridge into the moulded housing.
- Close the hot tap, turn on isolating valve or main stop cock to the system. Check for leaks.
Descaling immersion heater (if necessary)
With the mains supply turned off and the lowest hot tap open:
- Isolate the electrical supply and turn off the boiler or heat pump.
- Attach a hosepipe to the drain cock having sufficient length to take water to a suitable discharge point below the level of the unit.
- Open the cover(s) to the immersion heater housing(s) and disconnect the wiring from the immersion heater(s).
- Unscrew the immersion heater and withdraw it from the cylinder.
- Take care when lifting the immersion heater from the cylinder, and work within safe working practices.
- Carefully remove any scale from the surface of the element(s).
- Ensure sealing surfaces are clean and the gasket is undamaged; if in doubt, fit a new gasket.
- Refit the immersion heater(s), ensuring not to trap the gasket.
- Rewire, check, close, and secure immersion heater housing cover(s).
Re-commissioning
- Check all electrical and plumbing connections are secure. Close the drain cock.
- With a hot tap open, turn on the cold water supply and allow the unit to refill.
- DO NOT switch on the immersion heater, boiler or heat pump until the unit is full.
- When water flows from the hot tap, allow it to flow for a short while to purge air and flush through any disturbed particles.
- Close the hot tap and then open successive hot taps in the system to purge any air.
- When completely full and purged, check the system for leaks.
- The heating source (immersion heater, boiler or heat pump) can then be switched on.
- Check the outlet temperature at the outlet closest to the cylinder to determine whether the immersion thermostat is operating correctly.
Service Record
- Complete the service records at the rear of the installation and service manual and leave them with the homeowner for their records.
- Arrange to book another cylinder service at an annual interval.
Regular maintenance of our cylinders is highly recommended as this helps minimise any risk of future breakdowns or failures. It can also improve the performance and efficiency of the Mixergy cylinder, keeping it in peak condition.
Read more about our care plan and warranty or visit our knowledge hub for more information on troubleshooting, servicing and more.

